


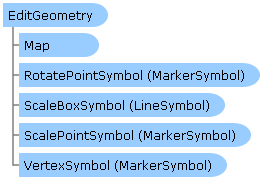
 Object Model
Syntax
| Visual Basic (Declaration) | |
|---|---|
Public Class EditGeometry Inherits System.Windows.DependencyObject | |
| C# | |
|---|---|
public class EditGeometry : System.Windows.DependencyObject | |
Remarks
The EditGeometry Class enables editing a Graphic in a GraphicsLayer. The EditGeometry Class is not a UI Control that you drag-and-drop on the XAML design surface of an application like the Controls in the ESRI.ArcGIS.Client.Toolkit Assembly. The EditGeometry Class allows visual Graphics editing in a Map Control when configured.
The Graphic type that can be edited by the EditGeometry Class must be of the Geometry type of: Polygon, Polyline or Envelope. NOTE: The EditGeometry object cannot control the editing of MapPoint or MultiPoint Geometry types. The editing of MapPoint or MultiPoint based Graphics must be done via other techniques such as custom code in the GraphicsLayer.MouseLeftButtonDown, Map.MouseMove, and Map.MouseLeftButtonUp Events, etc.
The bare minimum EditGeometry object settings that are required to successfully edit a Polygon, Polyline or Envelope based Graphic are:
- EditGeometry.Map
Use the EditGeometry.Map Property to bind to a Map Control that has a GraphicsLayer with Graphics that you want to edit. - EditGeometry.IsEnabled
Set the EditGeometry.IsEnabled Property to True to enable the EditGeometry Class to be able to edit Graphics. - EditGeometry.StartEdit(Graphic)
The EditGeometry.StartEdit Method takes a single Graphic as a parameter and that Graphic becomes the active one being edited. The input Graphic for the parameter must be a Polygon, Polyline or Envelope. NOTE: if you use the EditGeometry.StartEdit Method within an event such as the GraphicsLayer.MouseLeftButtonDown Event consider setting the ESRI.ArcGIS.Client.GraphicMouseButtonEventArgs.Handled Property to True (ex: VB.NET: e.Handled = True or C#: e.Handled = true;). This will keep the GraphicsLayer.MouseLeftButtonDown Event handler from bubbling up to other event handlers and thereby allow end user to perform the editing on the Graphic. - EditGeometry.StopEdit
Use the EditGeometry.StopEdit Method to stop the editing process on a particular Graphic; leaving the Graphic in that state.
See the code example in the EditGeometry(Map) constructor for using the bare-bones settings to edit a Polygon Graphic.
Example
How to use:
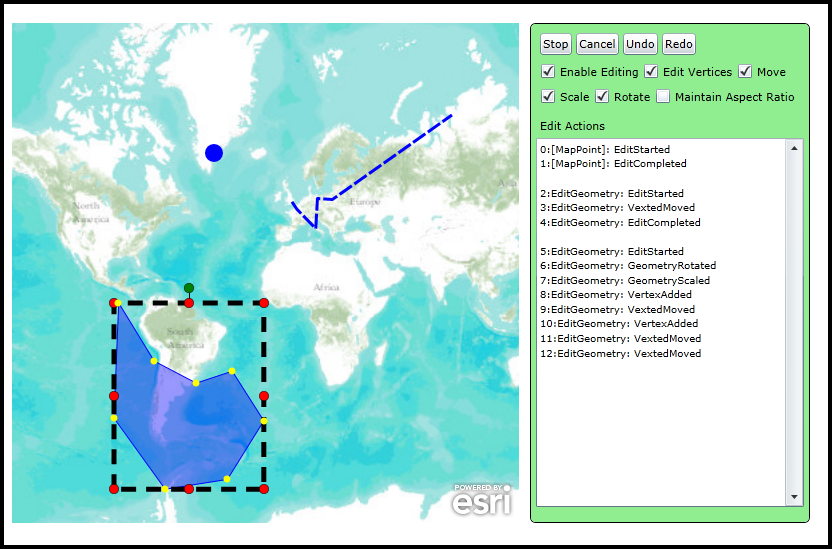
This example code shows how to enable editing of MapPoint, Polygon, and Polyline Geometry objects in a GraphicsLayer. For Polygon and Polyline edits, the EditGeometry Class is used. For MapPoint edits, a set of custom coding practices using the GraphicsLayer.LeftMouseButtonDown, Map.MouseMove, and Map.MouseLeftButtonUp Events are shown. As you edit a particular Geometry, the type of Edit Action that is occuring is displayed in the TextBox. Experiment with the various Buttons and CheckBoxes to see how flow of editing Graphics occurs.
The XAML code in this example is used in conjunction with the code-behind (C# or VB.NET) to demonstrate the functionality.
The following screen shot corresponds to the code example in this page.
| XAML |  Copy Code Copy Code |
|---|---|
<Grid x:Name="LayoutRoot" Background="White"> <!-- Define XAML Resources that can be used in other parts of the application. --> <Grid.Resources> <!-- This will define the look an behavior of the symbology for the MapPoint Graphic being edited in the GraphicsLayer. When the MapPoint IS NOT selected it will be a circle solid Blue in color. When the MapPoint IS selected (meaning it is in the process of being edited/moved) it will be transparent with a black outline for the circle. A ControlTemplate is used to animate behavior of the MapPoint via the VisualStateManager. --> <esri:MarkerSymbol x:Key="EditMarkerSymbol" OffsetX="9" OffsetY="9"> <esri:MarkerSymbol.ControlTemplate> <ControlTemplate> <Ellipse x:Name="root" Width="18" Height="18" Cursor="Hand" Stroke="Black" StrokeThickness="0" Fill="Blue"> <VisualStateManager.VisualStateGroups> <VisualStateGroup x:Name="SelectionStates"> <VisualState x:Name="Unselected" /> <VisualState x:Name="Selected"> <Storyboard> <DoubleAnimation BeginTime="00:00:00" Storyboard.TargetName="root" Storyboard.TargetProperty="StrokeThickness" To="1" Duration="0" /> <ColorAnimation BeginTime="00:00:00" Storyboard.TargetName="root" Storyboard.TargetProperty="(Rectangle.Fill).(SolidColorBrush.Color)" To="Transparent" Duration="0" /> <ObjectAnimationUsingKeyFrames BeginTime="0" Storyboard.TargetName="root" Storyboard.TargetProperty="Cursor"> <DiscreteObjectKeyFrame KeyTime="0" Value="None" /> </ObjectAnimationUsingKeyFrames> </Storyboard> </VisualState> </VisualStateGroup> </VisualStateManager.VisualStateGroups> </Ellipse> </ControlTemplate> </esri:MarkerSymbol.ControlTemplate> </esri:MarkerSymbol> <!-- Define the ControlTemplate that will be used by the EditGeometry.VertexSymbol Property to define what a vertex in a Polygon and Polyline will look like when being edited. Animations are used via the VisualStateManager. --> <ControlTemplate x:Key="EditVertexSymbol"> <Ellipse x:Name="root" Width="7" Height="7" Cursor="Hand" Stroke="Black" StrokeThickness="0" Fill="Yellow"> <VisualStateManager.VisualStateGroups> <VisualStateGroup x:Name="SelectionStates"> <VisualState x:Name="Unselected" /> <VisualState x:Name="Selected"> <Storyboard> <DoubleAnimation BeginTime="00:00:00" Storyboard.TargetName="root" Storyboard.TargetProperty="StrokeThickness" To="1" Duration="0" /> <ColorAnimation BeginTime="00:00:00" Storyboard.TargetName="root" Storyboard.TargetProperty="(Rectangle.Fill).(SolidColorBrush.Color)" To="Transparent" Duration="0" /> <ObjectAnimationUsingKeyFrames BeginTime="0" Storyboard.TargetName="root" Storyboard.TargetProperty="Cursor"> <DiscreteObjectKeyFrame KeyTime="0" Value="None" /> </ObjectAnimationUsingKeyFrames> </Storyboard> </VisualState> </VisualStateGroup> </VisualStateManager.VisualStateGroups> </Ellipse> </ControlTemplate> <!-- Define the ControlTemplate that will be used by the EditGeometry.ScalePointSymbol Property to define what the outer selection handles on a Polygon and Polyline will look like when being scaled to a different size. Animations are used via the VisualStateManager. --> <ControlTemplate x:Key="ScalePointSymbol"> <Ellipse x:Name="root" Width="10" Height="10" Cursor="Hand" Stroke="Black" StrokeThickness="0.5" Fill="Red"> <VisualStateManager.VisualStateGroups> <VisualStateGroup x:Name="SelectionStates"> <VisualState x:Name="Unselected" /> <VisualState x:Name="Selected"> <Storyboard> <DoubleAnimation BeginTime="00:00:00" Storyboard.TargetName="root" Storyboard.TargetProperty="StrokeThickness" To="1" Duration="0" /> <ColorAnimation BeginTime="00:00:00" Storyboard.TargetName="root" Storyboard.TargetProperty="(Rectangle.Fill).(SolidColorBrush.Color)" To="Yellow" Duration="0" /> <ObjectAnimationUsingKeyFrames BeginTime="0" Storyboard.TargetName="root" Storyboard.TargetProperty="Cursor"> <DiscreteObjectKeyFrame KeyTime="0" Value="None" /> </ObjectAnimationUsingKeyFrames> </Storyboard> </VisualState> </VisualStateGroup> </VisualStateManager.VisualStateGroups> </Ellipse> </ControlTemplate> <!-- Define the ControlTemplate that will be used by the EditGeometry.RotatePointSymbol Property to define what the top lollipop handle on a Polygon and Polyline will look like when being rotated. Animations are used via the VisualStateManager. --> <ControlTemplate x:Key="RotatePointSymbol"> <Grid Width="10" Height="20" x:Name="root" Cursor="Hand" > <Grid.RowDefinitions> <RowDefinition/> <RowDefinition/> </Grid.RowDefinitions> <Ellipse x:Name="rect" Stroke="Black" StrokeThickness="0.5" Fill="Green"/> <Rectangle Width="1" Grid.Row="1" Fill="Black" HorizontalAlignment="Center" /> <VisualStateManager.VisualStateGroups> <VisualStateGroup x:Name="SelectionStates"> <VisualState x:Name="Unselected" /> <VisualState x:Name="Selected"> <Storyboard> <DoubleAnimation BeginTime="00:00:00" Storyboard.TargetName="rect" Storyboard.TargetProperty="StrokeThickness" To="1" Duration="0" /> <ColorAnimation BeginTime="00:00:00" Storyboard.TargetName="rect" Storyboard.TargetProperty="(Rectangle.Fill).(SolidColorBrush.Color)" To="Yellow" Duration="0" /> <ObjectAnimationUsingKeyFrames BeginTime="0" Storyboard.TargetName="root" Storyboard.TargetProperty="Cursor"> <DiscreteObjectKeyFrame KeyTime="0" Value="None" /> </ObjectAnimationUsingKeyFrames> </Storyboard> </VisualState> </VisualStateGroup> </VisualStateManager.VisualStateGroups> </Grid> </ControlTemplate> <!-- Define the ControlTemplate that will be used by the EditGeometry.ScaleBoxSymbol Property to define what the envelope lines connecting to the outer selection handles on a Polygon and Polyline will look like when being scaled to a different size. --> <ControlTemplate x:Key="EditLineSymbol"> <Path x:Name="Element" Stroke="{Binding Symbol.Color}" StrokeStartLineCap="Round" StrokeThickness="{Binding Symbol.Width}" StrokeLineJoin="Round" StrokeEndLineCap="Round" StrokeDashArray="3 2" Fill="{x:Null}" /> </ControlTemplate> <!-- Define how various symbols will look like when editing Polygon and Polyline Graphics in the GraphicsLayer using the EditGeometry object. Each symbol has its ControlTemplate Property bound to custom ControlTemplates defined previously in this XAML Grid.Resource section. Some of the custom ControlTemplates use animations via the VisualStateManager to enhance the viewing of the editing experience. --> <esri:MarkerSymbol x:Key="MyVertexSymbol" ControlTemplate="{StaticResource EditVertexSymbol}" OffsetX="3.5" OffsetY="3.5"/> <esri:MarkerSymbol x:Key="MyScaleSymbol" ControlTemplate="{StaticResource ScalePointSymbol}" OffsetX="5" OffsetY="5"/> <esri:MarkerSymbol x:Key="MyRotateSymbol" ControlTemplate="{StaticResource RotatePointSymbol}" OffsetX="5" OffsetY="20"/> <esri:LineSymbol x:Key="MyScaleBox" ControlTemplate="{StaticResource EditLineSymbol}" Color="Black" Width="5"/> <!-- Define the EditGeometry object. This will control the editing of Polygon and Polyline Graphics in the GraphicsLayer. NOTE: The EditGeometry object CANNOT control the editing of MapPoint Graphics; this must be done via other techniques such as custom code in the GraphicsLayer.MouseLeftButtonDown, Map.MouseMove, and Map.MouseLeftButtonUp Events. Bind the EditGeometry.Map Property to the Map Control. Set the EditGeometry.IsEnabled Property to True. This will cause the CheckBoxEnableEditing.IsCheckedProperty to become True due to binding that will be done later in the XAML. Wire up the EditGeometry.GeometryEdit Event to display information to the user on what type of EditGeometry edit action is occurring. Set the EditGeometry.VertexSymbol Property to use Binding to the Grid.Resource called 'MyVertexSymbol' to display what a vertex in a Polygon and Polyline will look like when being edited. Set the EditGeometry.ScalePointSymbol Property to use Binding to the Grid.Resource called 'MyScaleSymbol' to display what the outer selection handles on a Polygon and Polyline will look like when being scaled to a different size. Set the EditGeometry.ScaleBoxSymbol Property to use Binding to the Grid.Resource called 'MyScaleBox' to display what the envelope lines connecting to the outer selection handles on a Polygon and Polyline will look like when being scaled to a different size. Set the EditGeometry.RotatePointSymbol Property to use Binding to the Grid.Resource called 'MyRotateSymbol' to display what the top lollipop handle on a Polygon and Polyline will look like when being rotated. --> <esri:EditGeometry x:Key="MyEditGeometry" Map="{Binding ElementName=MyMap}" IsEnabled="True" GeometryEdit="EditGeometry_GeometryEdit" VertexSymbol="{StaticResource MyVertexSymbol}" ScalePointSymbol="{StaticResource MyScaleSymbol}" ScaleBoxSymbol="{StaticResource MyScaleBox}" RotatePointSymbol="{StaticResource MyRotateSymbol}"/> </Grid.Resources> <!-- Add a Map Control. Set the Editor.SnapDistance Dependency Property (i.e. Editor.SnapDistanceProperty Field in the API Ref Doc). This determines the radius in pixels that vertices in a Polygon or Polyline will snap together. Wire up the Map.MouseClick Event in code-behind to handle stop editing of the EditGeometry object. Wire up the Map.MouseMove Event in the code-behind to handling moving a MapPoint Graphic across the Map. Wire up the Map.MouseLeftButtonUp Event in the code-behind to handle the end of moving a MapPoint Graphic across the Map (this will unselect the MapPoint Graphic and write editing log information in the TextBox). --> <esri:Map x:Name="MyMap" Height="500" Extent="-16574645.619,-5541958.774,13341035.686,10559275.713" esri:Editor.SnapDistance="30" MouseClick="MyMap_MouseClick" MouseMove="MyMap_MouseMove" MouseLeftButtonUp="MyMap_MouseLeftButtonUp" Margin="0,100,291,0"> <!-- Add a backdrop ArcGISTiledMapServiceLayer. --> <esri:ArcGISTiledMapServiceLayer Url="http://services.arcgisonline.com/ArcGIS/rest/services/World_Topo_Map/MapServer"/> <!-- Add a GraphicsLayer with three default Graphics (one Polygon, one Polyline, and one MapPoint) for editing. Define the display symbology for each Graphic. The GraphicLayer.MouseLeftButtonDown Event is wired up for code-behind functionality. The code-behind function will determine if the user is trying to edit a Polygon or Polyline via the EditGeometry object OR if they are trying to edit a MapPoint using more custom coding in the Map.MouseMove and Map.MouseLeftButtonUp Events. --> <esri:GraphicsLayer ID="MyGraphicsLayer" MouseLeftButtonDown="GraphicsLayer_MouseLeftButtonDown"> <esri:GraphicsLayer.Graphics> <!-- Define the Polygon Graphic and a default symbol.--> <esri:Graphic> <esri:Polygon> <esri:Polygon.Rings> <esri:PointCollection> <esri:MapPoint X="-5570316" Y="-1153156" /> <esri:MapPoint X="-6961809" Y="335638" /> <esri:MapPoint X="-9270798" Y="-437047" /> <esri:MapPoint X="-11440638" Y="-2897131" /> <esri:MapPoint X="-8192446" Y="-3919220" /> <esri:MapPoint X="-5766015" Y="-3003044" /> <esri:MapPoint X="-5570316" Y="-1153156" /> </esri:PointCollection> </esri:Polygon.Rings> </esri:Polygon> <esri:Graphic.Symbol> <esri:SimpleFillSymbol Fill="#660000FF" BorderBrush="Blue" BorderThickness="1" /> </esri:Graphic.Symbol> </esri:Graphic> <!-- Define the Polyline Graphic and a default symbol.--> <esri:Graphic> <esri:Polyline > <esri:Polyline.Paths> <esri:PointCollection> <esri:MapPoint X="0" Y="6692177" /> <esri:MapPoint X="293549" Y="6251985" /> <esri:MapPoint X="1399063" Y="5117041" /> <esri:MapPoint X="1496913" Y="6887933" /> <esri:MapPoint X="2377450" Y="6829107" /> <esri:MapPoint X="3375429" Y="8365309" /> </esri:PointCollection> </esri:Polyline.Paths> </esri:Polyline> <esri:Graphic.Symbol> <esri:SimpleLineSymbol Color="Blue" Width="3" Style="Dash" /> </esri:Graphic.Symbol> </esri:Graphic> <!-- Define the MapPoint Graphic and a default symbol (that comes from the XAML Resources section).--> <esri:Graphic Symbol="{StaticResource EditMarkerSymbol}"> <esri:MapPoint X="-10775727" Y="3866575" /> </esri:Graphic> </esri:GraphicsLayer.Graphics> </esri:GraphicsLayer> </esri:Map> <!-- Define a visual container for the UI Controls that the user will interact with to control how the editing of Graphics will occur in the GraphicsLayer of the Map Control. The Border.DataContext uses Binding to attach Dependency Properties to the EditGeometry object. The EditGeometry object (MyEditGeometry in our case) is defined earlier in XAML in the Grid.Resources section. Some of the CheckBox Controls have various Properties that use Binding that bubble up to through Border.DataContext setting to impact the behavior of the EditGeometry object. For example: the CheckBoxEnableEditing.IsChecked Property is bound to the MyEditGeometry.IsEnabled Property. Another example is: the CheckBoxEditVerticiesEnabled.IsChecked is bound to the MyEditGeometry.EditVerticiesEnabled Property. --> <Border Background="LightGreen" BorderThickness="1" CornerRadius="5" HorizontalAlignment="Right" VerticalAlignment="Top" Padding="5" BorderBrush="Black" Margin="0,100,0,0" DataContext="{StaticResource MyEditGeometry}" Height="500" Width="280"> <Grid> <Grid.RowDefinitions> <RowDefinition Height="103*" /> <RowDefinition Height="381*" /> <RowDefinition Height="4*" /> </Grid.RowDefinitions> <StackPanel x:Name="EditGeometryTools" Orientation="Vertical" Margin="0,0,0,23"> <!-- Add Button Controls with code-behind Click events to impact how Graphics editing occurs in the EditGeometry object. --> <StackPanel Orientation="Horizontal" Margin="2"> <Button x:Name="StopEdit" Content="Stop" Click="StopEdit_Click" Margin="2"/> <Button x:Name="CancelEdit" Content="Cancel" Click="CancelEdit_Click" Margin="2"/> <Button x:Name="UndoLastEdit" Content="Undo" Click="UndoLastEdit_Click" Margin="2"/> <Button x:Name="RedoLastEdit" Content="Redo" Click="RedoLastEdit_Click" Margin="2"/> </StackPanel> <!-- Add CheckBox Controls that have Bindings set on the IsChecked Properties to control how editng occurs in the EditGeometry object. --> <StackPanel Orientation="Horizontal" Margin="2"> <CheckBox x:Name="CheckBoxEnabledEditing" Content="Enable Editing" IsChecked="{Binding IsEnabled, Mode=TwoWay}" Margin="2"/> <CheckBox x:Name="CheckBoxEditVerticiesEnabled" Content="Edit Vertices" IsChecked="{Binding EditVerticesEnabled, Mode=TwoWay}" Margin="2"/> <CheckBox x:Name="CheckBoxMoveEnabled" Content="Move" IsChecked="{Binding MoveEnabled, Mode=TwoWay}" Margin="2"/> </StackPanel> <StackPanel Orientation="Horizontal" Margin="2"> <CheckBox x:Name="CheckBoxScaleEnabled" Content="Scale" IsChecked="{Binding ScaleEnabled, Mode=TwoWay}" Margin="2"/> <CheckBox x:Name="CheckBoxRotateEnabled" Content="Rotate" IsChecked="{Binding RotateEnabled, Mode=TwoWay}" Margin="2"/> <CheckBox x:Name="CheckBoxMaintainAspectRatio" Content="Maintain Aspect Ratio" IsChecked="{Binding MaintainAspectRatio, Mode=TwoWay}" Margin="2"/> </StackPanel> </StackPanel> <!-- Display to the user what type of Editing action is occurring on the Graphics in the GraphicsLayer. --> <TextBlock Text="Edit Actions" Margin="4,89,0,0" /> <TextBox x:Name="ActionTextBox" Grid.Row="1" FontSize="10" VerticalScrollBarVisibility="Visible" Margin="0,6" /> </Grid> </Border> <!-- Provide the instructions on how to use the sample code. --> <TextBlock Height="100" HorizontalAlignment="Left" Name="TextBlock1" VerticalAlignment="Top" Width="788" TextWrapping="Wrap" Text="This example code shows how to enable editing of MapPoint, Polygon, and Polyline Geometry objects in a GraphicsLayer. For Polygon and Polyline edits, the EditGeometry Class is used. For MapPoint edits, a set of custom coding practices using the GraphicsLayer.LeftMouseButtonDown, Map.MouseMove, and Map.MouseLeftButtonUp Events are shown. As you edit a particular Geometry, the type of Edit Action that is occuring is displayed in the TextBox. Experiment with the various Buttons and CheckBoxes to see how flow of editing Graphics occurs." /> </Grid> | |
| C# | Copy Code |
|---|---|
// Global/Member variable for the EditGeometry object (enables editing Polygon and Polyline graphics). private ESRI.ArcGIS.Client.EditGeometry _EditGeometry; // Global/Member variable for editing/moving the MapPoint Graphic in the GraphicsLayer. private ESRI.ArcGIS.Client.Graphic _SelectedPointGraphic; // Global/Member variable to display to the user which Graphic in the GraphicsLayer is being edited. private int _ActionCount = 0; public MainPage() { InitializeComponent(); // Get the EditGeometry object that was defined in the XAML section. This enables // editing Polygon and Polyline geometries in the GraphicsLayer. _EditGeometry = this.LayoutRoot.Resources["MyEditGeometry"] as ESRI.ArcGIS.Client.EditGeometry; } private void GraphicsLayer_MouseLeftButtonDown(object sender, ESRI.ArcGIS.Client.GraphicMouseButtonEventArgs e) { // The code in this event handler is to decide if the user is attempting to edit a MapPoint OR Polygon/Polyline // Graphic in the GraphicsLayer. The EditGeometry object only enables editing on Polygons and Polylines. We need // to add our own custom coding to handle editing/moving MapPoint Graphics. // Keep this event handler from bubbling up to other event handlers. We will perform all actions necessary in // this event handler. e.Handled = true; // Branch the logic depending on the type of Graphic being chosen. if (e.Graphic.Geometry is ESRI.ArcGIS.Client.Geometry.MapPoint) { // The Graphic that was clicked on in the GraphicsLayer by the user is a MapPoint. We will use our own custom // implementation in this code section and the Map.MouseMove and Map.MouseLeftButtonUp Events to control the // editing/movement of the MapPoint Graphic in the GraphicsLayer. // To give the user a fluid editing experience in the application, determine if the CheckBoxEnableEditing // is checked or not. In XAML the CheckBoxEnableEditing.IsChecked Property has binding set to the // EditGeometry.IsEnabled Property to control if a Polygon or Polyline Graphic can be edited. Since the // EditGeometry does not work for MapPoint Graphics, we will just check to see if the CheckBoxEnabledEditing // .IsChecked Property is checked and control whether the user can select and move the MapPoint. if ((bool)CheckBoxEnabledEditing.IsChecked) { // The CheckBoxEnableEditing.IsChecked = True. // Select the MapPoint Graphic. e.Graphic.Selected = true; // Set the global/member variable to the active MapPoint Graphic. _SelectedPointGraphic = e.Graphic; // Write information to TextBox about what action is occurring. WriteEditingLog(_ActionCount, "[MapPoint]: EditStarted", false); // Increment the counter. _ActionCount += 1; } } else { // The Graphic that was clicked on in the GraphicsLayer by the user is a Polygon or Polyline. Use the EditGeometry // object to start editing. _EditGeometry.StartEdit(e.Graphic); } } #region Editing the MapPoint Graphic // This section has our custom coding to move/edit the MapPoint Graphic. private void MyMap_MouseMove(object sender, MouseEventArgs e) { // Only do something if we are processing a MapPoint Graphic. if (_SelectedPointGraphic != null) { // Move the MapPoint across the screen. _SelectedPointGraphic.Geometry = MyMap.ScreenToMap(e.GetPosition(MyMap)); } } private void MyMap_MouseLeftButtonUp(object sender, MouseButtonEventArgs e) { // Only do something if we are processing a MapPoint Graphic. if (_SelectedPointGraphic != null) { // Unselect the MapPoint Graphic, then set it to Nothing/null. _SelectedPointGraphic.Selected = false; _SelectedPointGraphic = null; // Write information to TextBox about what action is occurring. WriteEditingLog(_ActionCount, "[MapPoint]: EditCompleted", true); // Increment the counter. _ActionCount += 1; } } #endregion #region Editing the Polygon and Polyline Grahphics with the EditGeometry object // This section has various actions to control the Properties of the EditGeometry global/member variable // that is used to edit Polygon and Polyline Graphics in the GraphicsLayer. private void StopEdit_Click(object sender, System.Windows.RoutedEventArgs e) { // The user clicked the StopEdit button. NOTE: They could also stop editing by just clicking in the // Map not directly over the Graphic in the GraphicLayer. _EditGeometry.StopEdit(); } private void CancelEdit_Click(object sender, System.Windows.RoutedEventArgs e) { // The user clicked the CancelEdit button. No changes will be made to the Graphic. Any interim state // changes made to the Graphic will be lost. _EditGeometry.CancelEdit(); } private void UndoLastEdit_Click(object sender, System.Windows.RoutedEventArgs e) { // The user clicked the UndoLastEdit button. The most recent edit action (like: VertexAdded, VertexMoved, // GeometryRotated, etc.) will be reverted to its prior state (aka an Undo). _EditGeometry.UndoLastEdit(); } private void RedoLastEdit_Click(object sender, System.Windows.RoutedEventArgs e) { // The user clicked the RedoLastEdit button. If an Undo was previously performed such that we are NOT // currently performing the most recent action then, we can Redo it back to the most current editing state. _EditGeometry.RedoLastEdit(); } private void MyMap_MouseClick(object sender, ESRI.ArcGIS.Client.Map.MouseEventArgs e) { // The user can also stop editing the Graphic by clicking in the Map NOT directly over the Graphic in the // GraphicLayer. The same thing could be accomplished by click the StopEdit button. _EditGeometry.StopEdit(); } private void EditGeometry_GeometryEdit(object sender, ESRI.ArcGIS.Client.EditGeometry.GeometryEditEventArgs e) { // Determine what informational message to display to the user when using the EditGeometry object. if (e.Action.ToString() == "EditCompleted" || e.Action.ToString() == "EditCanceled") { // Write information to TextBox about what action is occurring. Add a blank line to clearly delineate that // the user has completed editing a particular Polygon or Polyline. WriteEditingLog(_ActionCount, "EditGeometry: " + e.Action.ToString(), true); } else { // Write information to TextBox about what action is occurring. This will show interim editing messages for things // like: GeometryMoved, VertexMoved, GeometryScaled, GeometryRotated, etc. WriteEditingLog(_ActionCount, "EditGeometry: " + e.Action.ToString(), false); } // Increment the counter. _ActionCount += 1; } #endregion private void WriteEditingLog(int ActionCount, string ActionOccuring, bool WriteNewLine) { // Write out information into a TextBox for the various editing action that is occurring. ActionTextBox.SelectedText = string.Format("{0}:{1}{2}", ActionCount, ActionOccuring, Environment.NewLine); // Embed a blank line when the WriteNewLine parameter is true. This help to show that we have completed // editing a particular Graphic. if (WriteNewLine) { ActionTextBox.SelectedText = Environment.NewLine; } } | |
| VB.NET | Copy Code |
|---|---|
' Global/Member variable for the EditGeometry object (enables editing Polygon and Polyline graphics). Private _EditGeometry As ESRI.ArcGIS.Client.EditGeometry ' Global/Member variable for editing/moving the MapPoint Graphic in the GraphicsLayer. Private _SelectedPointGraphic As ESRI.ArcGIS.Client.Graphic ' Global/Member variable to display to the user which Graphic in the GraphicsLayer is being edited. Private _ActionCount As Integer = 0 Public Sub New() InitializeComponent() ' Get the EditGeometry object that was defined in the XAML section. This enables ' editing Polygon and Polyline geometries in the GraphicsLayer. _EditGeometry = TryCast(Me.LayoutRoot.Resources("MyEditGeometry"), ESRI.ArcGIS.Client.EditGeometry) End Sub Private Sub GraphicsLayer_MouseLeftButtonDown(ByVal sender As Object, ByVal e As ESRI.ArcGIS.Client.GraphicMouseButtonEventArgs) ' The code in this event handler is to decide if the user is attempting to edit a MapPoint OR Polygon/Polyline ' Graphic in the GraphicsLayer. The EditGeometry object only enables editing on Polygons and Polylines. We need ' to add our own custom coding to handle editing/moving MapPoint Graphics. ' Keep this event handler from bubbling up to other event handlers. We will perform all actions necessary in ' this event handler. e.Handled = True ' Branch the logic depending on the type of Graphic being chosen. If TypeOf e.Graphic.Geometry Is ESRI.ArcGIS.Client.Geometry.MapPoint Then ' The Graphic that was clicked on in the GraphicsLayer by the user is a MapPoint. We will use our own custom ' implementation in this code section and the Map.MouseMove and Map.MouseLeftButtonUp Events to control the ' editing/movement of the MapPoint Graphic in the GraphicsLayer. ' To give the user a fluid editing experience in the application, determine if the the CheckBoxEnableEditing ' is checked or not. In XAML the CheckBoxEnableEditing.IsChecked Property has binding set to the ' EditGeometry.IsEnabled Property to control if a Polygon or Polyline Graphic can be edited. Since the ' EditGeometry does not work for MapPoint Graphics, we will just check to see if the CheckBoxEnabledEditing ' .IsChecked Property is checked and control whether the user can select and move the MapPoint. If CheckBoxEnabledEditing.IsChecked Then ' The CheckBoxEnableEditing.IsChecked = True. ' Select the MapPoint Graphic. e.Graphic.Selected = True ' Set the global/member variable to the active MapPoint Graphic. _SelectedPointGraphic = e.Graphic ' Write information to TextBox about what action is occuring. WriteEditingLog(_ActionCount, "[MapPoint]: EditStarted", False) ' Increment the counter. _ActionCount += 1 End If Else ' The Graphic that was clicked on in the GraphicsLayer by the user is a Polygon or Polyline. Use the EditGeometry ' object to start editing. _EditGeometry.StartEdit(e.Graphic) End If End Sub #Region "Editing the MapPoint Graphic" ' This section has our custom coding to move/edit the MapPoint Graphic. Private Sub MyMap_MouseMove(ByVal sender As Object, ByVal e As MouseEventArgs) ' Only do something if we are processing a MapPoint Graphic. If _SelectedPointGraphic IsNot Nothing Then ' Move the MapPoint across the screen. _SelectedPointGraphic.Geometry = MyMap.ScreenToMap(e.GetPosition(MyMap)) End If End Sub Private Sub MyMap_MouseLeftButtonUp(ByVal sender As Object, ByVal e As MouseButtonEventArgs) ' Only do something if we are processing a MapPoint Graphic. If _SelectedPointGraphic IsNot Nothing Then ' Unselect the MapPoint Graphic, then set it to Nothing/null. _SelectedPointGraphic.Selected = False _SelectedPointGraphic = Nothing ' Write information to TextBox about what action is occuring. WriteEditingLog(_ActionCount, "[MapPoint]: EditCompleted", True) ' Increment the counter. _ActionCount += 1 End If End Sub #End Region #Region "Editing the Polygon and Polyline Grahphics with the EditGeometry object" ' This section has various actions to control the Properties of the EditGeometry global/member variable ' that is used to edit Polygon and Polyline Graphics in the GraphicsLayer. Private Sub StopEdit_Click(ByVal sender As Object, ByVal e As System.Windows.RoutedEventArgs) ' The user clicked the StopEdit button. NOTE: They could also stop editing by just clicking in the ' Map not directly over the Graphic in the GraphicLayer. _EditGeometry.StopEdit() End Sub Private Sub CancelEdit_Click(ByVal sender As Object, ByVal e As System.Windows.RoutedEventArgs) ' The user clicked the CancelEdit button. No changes will be made to the Graphic. Any interim state ' changes made to the Graphic will be lost. _EditGeometry.CancelEdit() End Sub Private Sub UndoLastEdit_Click(ByVal sender As Object, ByVal e As System.Windows.RoutedEventArgs) ' The user clicked the UndoLastEdit button. The most recent edit action (like: VertexAdded, VertexMoved, ' GeometryRotated, etc.) will be reverted to its prior state (aka an Undo). _EditGeometry.UndoLastEdit() End Sub Private Sub RedoLastEdit_Click(ByVal sender As Object, ByVal e As System.Windows.RoutedEventArgs) ' The user clicked the RedoLastEdit button. If an Undo was previously performed such that we are NOT ' currently performing the most recent action then, we can Redo it back to the most current editng state. _EditGeometry.RedoLastEdit() End Sub Private Sub MyMap_MouseClick(ByVal sender As Object, ByVal e As ESRI.ArcGIS.Client.Map.MouseEventArgs) ' The user can also stop editing the Graphic by clicking in the Map NOT directly over the Graphic in the ' GraphicLayer. The same thing could be accompolished by click the StopEdit button. _EditGeometry.StopEdit() End Sub Private Sub EditGeometry_GeometryEdit(ByVal sender As Object, ByVal e As ESRI.ArcGIS.Client.EditGeometry.GeometryEditEventArgs) ' Determine what informational message to display to the user when using the EditGeometry object. If e.Action.ToString = "EditCompleted" Or e.Action.ToString = "EditCanceled" Then ' Write information to TextBox about what action is occuring. Add a blank line to clearly delineate that ' the user has completed editing a particular Polygon or Polyline. WriteEditingLog(_ActionCount, "EditGeometry: " + e.Action.ToString, True) Else ' Write information to TextBox about what action is occuring. This will show interim editing messages for things ' like: GeometryMoved, VertexMoved, GeometryScaled, GeometryRotated, etc. WriteEditingLog(_ActionCount, "EditGeometry: " + e.Action.ToString, False) End If ' Increment the counter. _ActionCount += 1 End Sub #End Region Private Sub WriteEditingLog(ActionCount As Integer, ActionOccuring As String, WriteNewLine As Boolean) ' Write out information into a TextBox for the various editing action that is occuring. ActionTextBox.SelectedText = String.Format("{0}:{1}{2}", ActionCount, ActionOccuring, Environment.NewLine) ' Embed a blank line when the WriteNewLine parameter is true. This help to show that we have completed ' editing a particular Graphic. If WriteNewLine Then ActionTextBox.SelectedText = Environment.NewLine End If End Sub | |
Inheritance Hierarchy
System.Object
System.Windows.Threading.DispatcherObject
System.Windows.DependencyObject
ESRI.ArcGIS.Client.EditGeometry
Requirements
Target Platforms: Windows XP Professional, Windows Server 2003 family, Windows Vista, Windows Server 2008 family, Windows 7, Windows 8